
20V Blacktop Project - Days 22-23I'm at the point in the swap where there's a ton of little things to do. Here's what I got done a couple evenings this week and this weekend. Ran the power wire from the battery in the frunk to the engine bay. I used
one of the 2 firewall holes from the AC evaporator. It was wrapped in loom
and tape on the possible "rubbing" areas.
The dash was put back together. That took forever. So many screws... New Speedsource SS clutch line:
87-89 tail lights were installed. This wasn't as straight a bolt-on as what I thought. Had to drill a few more holes.
ECU mounted on the left side of the trunk. Made brackets using 1" aluminum stock:
Main coolant lines fabricated. Found a source locally for 6061 1-1/4" tubing. $2.85/ft and had to buy a 12ft piece.
The 'hot' line (engine to radiator) was easy. A short piece of pipe and
then 2 of the stock hoses.
Since the other line needs the radiator cap inline, it took some more thinking. I ended up going all the way over the the drivers side and circling around to the thermostat housing. Sucks because there's lots of potentials for leaks. Hopefully I won't have any problems. I need to go get some more clamps. Also still need to attach the rad cap to the firewall and mount the overflow tank. I think I'll go buy a new one, that should hopefully have an easier way of mounting than the stock one:
I also mounted the ignitor/coil to the driver's side strut tower. Fortunately, the 2 stock welded-nut locations there were perfect for the 20v ignitor/coil bracket. I tapped a third hole in the strut tower. A little bending of the bracket and everything bolted right up. It is slanted a little, but so what it'll work!
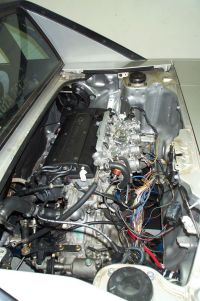
Ran the plug wires. I dremel'd out the lil plastic guide things a tad so that the Magnecors would fit:
And you could also see that I ran the engine harness and connected everything up. I'm not going to cover it all up until I get her running. Knowing my luck if I taped it up, I'd have to undo it all a couple weeks from now.
|
|
| Home • Links •
Email Disclaimer: This web page in no way replaces
the MR2 repair manual. Follow what it says before me. The purpose of
this page is to give you a better pictorial description of what to do.
I cannot be held responsible for any mishaps caused by this web page.
|
)
)
)
)
)
)
)
)
)
)
)
)
)
)
)
)
)