Home
  Links
transparent

4AGE 20V Blacktop

transparent transparent

Diary of Swap
Wiring
Transmission
Exhaust
Cooling System
Miscellaneous

Dyno

transparent

85/6 4AGE -> 4AGZE

transparent transparent

Wiring

transparent

Air Intake Filter
Alternator
Clutch Slave Cylinder
Clutch Master Cylinder
Coolant Flush
Distributor O-Rings
Exhaust Manifold
Fuel Filter

Fuel Pump Cut-off Switch

Ignition Timing
Oil Cooler Hoses
Oil Filter Adapter O-Rings
Oil Pan Gasket
Oxygen Sensor
Radiator Removal
Starter
Thermostat
Throttle Body Cleaning
TPS Adjustment
Water Pump

transparent

87+ Brake Upgrade
Caliper Rebuild-Front
Caliper Rebuild-Rear
Dust Shield Removal
Parking Brake Cable
SS Braided Brake Line

transparent

Ball Joint Replacement
Bushings Install - Front
Bushings Install - Rear
Steering Knuckle Removal
Struts/Springs - Front
Struts/Springs - Rear
Sway Bar End Links

transparent

87+ Antenna Replacement
Clear Turn Signals - Front
Clear Turn Signals - Rear
Door Hinges
Interior Door Triangles
Interior Headliner Painting
Interior Trim & Light Lens
Power Window Regulator
Rekeying Trunk Lock
Rust PM - Battery Bracket

Rust PM - Front Wheel Wells
Seats - MK3
Seats - Aftermarket
Shift Boot
SideMarker Mod
Sunroof Rattle
Wiper Switch

transparent

2006 Austin
2005 Austin
2005 Topeka NA2005
2004 Galveston
2004 Chattanooga SE2004
2003 Galveston
2002 Austin

transparent

Suspension Setup Pics
My MR2 Diary
Latest Pics of My MR2

Interior Door Triangle Pieces

As many of you MKIers know, the door triangle pieces break over time. Finding old ones in a junkyard that aren't broke is a very difficult task. And gluing them back on is only a temporary solution. Just outta curiousity I decided to call up my favorite Toyota dealer, and inquire about the cost. Being ready to hear some outrageous price, he came back with me with a list price of only $11 each! Cost to me was only $14 for the pair! Maybe I shoulda ordered a second set, just in case these break again...

Part #s:

  • 67492-17010 Driver Side
  • 67491-17010 Passenger Side


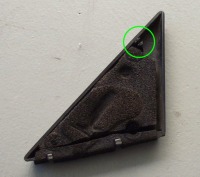
Here's the old one, notice the broken tab...


And the new ones, with tabs in perfect shape!


Just a pic with the triangle taken off.


And the new one that snaps in perfectly. No real install instructions needed, just put the bottom 2 tabs in first, and line up the top clip with the hole and snap it in.


Home   •   Links  •   Email
(remove NOSPAM from resulting email address)
Thanks for Visiting! - Eric Southers

Disclaimer: This web page in no way replaces the MR2 repair manual. Follow what it says before me. The purpose of this page is to give you a better pictorial description of what to do. I cannot be held responsible for any mishaps caused by this web page.