| * Courtesy of Bill Merton (bmerton)
of the MR2 Owners Club.
So you want to install Mk3 seats in your Mk1. It’s
really not that hard.
Tools needed:
- Torque wrench that can do 27 ft/lbs.
- 14mm socket/wrench
- 14mm combination wrench (ratcheting is a definite plus)
- Drill (and a metric buttload of crappy bits or 3-4 really
good ones)
- Safety glasses (of course)
- Ear defenders
- File
- Hammer
- Chisel
- Center Punch
- Cut-off tool
- Wire wheel
- Stone
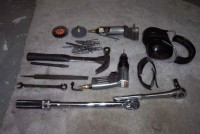
- And maybe the biggest tool of all (no reflection on Jeff,
of course), a friend with a welder!

1) Okay…first off, remove your stock Mk1 seat by removing
the four 14mm bolts that hold it to the floor. You’ll
be taking the mounting points loose of the rails on these
seats and transferring them over to the Spyder seats.
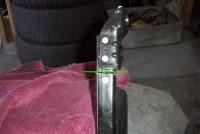
2) You’ll notice that each mounting point is held on
by one big rivet (red) and one spot weld (green). The rivet
is obvious enough. The location of the spot weld is where
the small circular indentation in the metal is.
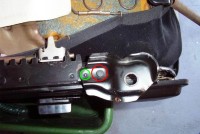
2) Use a center punch to make an indentation as close to the
center of the rivet and on the weld point. Drill them out.
Hopefully, you have some nice, new drill bits or you’re
going to play hell trying to drill through all this stuff
using many, many crappy, dull bits. I had luck starting with
a very small drill bit, then using progressively larger bits
to widen the holes.
3) Now use the hammer and chisel to take the head off of that
rivet. It will bend a bit, then go flying off (wear your safety
glasses any time you are working with impact type tools!)
Finally, you can take a hammer and chisel between the rail
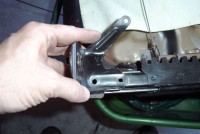
and mounting point to separate them. You’ll notice that
one mounting point (the one in the above picture) has a protrusion
to hook the seat return spring to. I used a cut-off tool to
remove this, as there is no spring on the Spyder seat. Well,
in retrospect, I should have looked to see if I could rig
that spring up. It’s kind of nice to have the seat go
forward when you release it.
4) So now you have the feet removed from your Mk1 seats.
Time to work on the Spyder seats…
First off, you’ll notice the two front mounting points
have the same set-up as the Mk1, with a rivet attachment and
a spot weld…but this “rivet” has a large
post/peg that goes into the floorboard on the Mk3.
5) I used a cutoff tool to remove most of this post, then
used the same center tap/drill technique as I used on the
Mk1 rails and mounts.
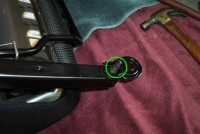
You’ll notice that one of the rear mounts on the Spyder
has two rivets, a spot weld, and a regular weld on one side.
Thankfully, you don’t have to attack this one. It just
gets cut off with the cut-off wheel just behind the other
rivet which serves as a rail stop.
6) After removing the Spyder mounting points, you’ll
need to prep the rails for welding. I used a stone to remove
the paint very quickly in the areas where they were to be
welded. Each rail had a couple of inches stripped at the front
edge. Then I stripped a section from about 11 – 13.5
inches from the front edge to mount the rear feet.
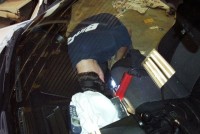
Off to Jeff’s house to weld ‘em (BTW, if you
can do this all at the location with the welder, all the better.
Driving your car with the seat loose is not very safe and
definitely not much fun).
7) Put all four Mk1 mounts in their respective places and
tighten them down. Put the seat rails full forward (as if
the seat was fully to the rear). Carefully position the seat
on the Mk1 mounts. Now tack the front mounts to the set.
8) Move the seat forward and tack the rear points. Now remove
the seat and weld the points securely to the rails. You can
probably get away with doing two welds inside the holes you
drilled, but why not be safe and draw a bead around as much
of the mount as you can?!?
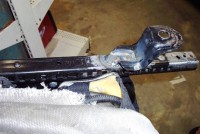
The above picture was of the first seat I did…before
I figured out you could cut that rail down a good bit.
9) The Mk3 has an integrated seat belt retainer. Problem
is, it accepts a smaller seat belt hook than what the Mk1
uses. So, you can remove a screw on the side of the Spyder
seat and use a 14mm wrench to remove the retainer and wiring
for it.
10) Install the seat, and check for proper travel. Finally,
it’s ready for paint. A quick prime (using rust converter,
if necessary) and paint (don’t forget to do the same
with the mounting bolts!!!) and you’re set to rock and
roll.
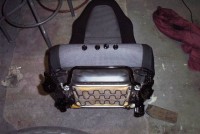
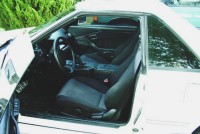
11) Install the seat and tighten the 4 bolts to 27 ft/lbs.
Nice, huh? (Forgive how dirty the seats and car are…couldn’t
wait to take the picture!)
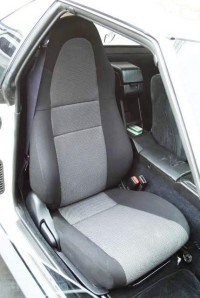
The passenger seat sits maybe ½” higher than
the stockers, but the angle of the bottom cushion of the driver’s
side is adjustable, so you lose maybe ½” with
it adjusted all the way up, and gain ¾” with
it completely down.
Many thanks to Jeff for helping me out with the welding!
|

)
)
)
)
)
)
)
)
)
)
)